
Dear Diary
by Anna Herman
Handcrafting a book to jot down favorite quotes or sketch your garden plans is an hour or two of work well spent. With a bit of planning and practice, you can transform scraps and hand-me-downs into practical or fantastical journals, albums or printed books. These make great presents and gifts, with or without the addition of your musings, illustrations or favorite quotes. A book is basically any assemblage of paper bound together—sewn, glued, riveted, stapled or some combination. There are many ways to approach making your own book—the following is one way to make a somewhat “classic” hardbound version.
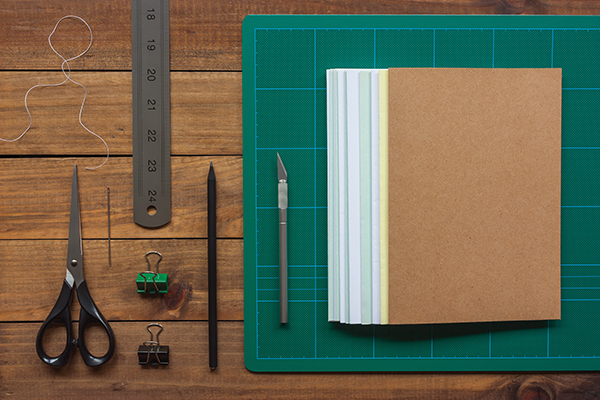
What You Need:
- Paper: your choice
- Glue: PVA (polyvinyl acetate—such as Elmer’s White)
- Cover board: stiff cardboard, foam board, thin wood
- Cover: paper, fabric, Tyvek, maps, etc.
- Other supplies: a stapler; dinner knife or bone-scoring tool; an eraser or cork; scissors
To make your book:
Stack paper in piles of three to eight sheets. You will be folding your paper in half, so each sheet will become four pages. Each folded stack is called a “folio.” Depending on the thickness of the paper, an eight sheet folio (32 pages) is about the maximum you can fold neatly by hand, so go from there.
Neatly fold each pile of sheets in half crosswise. Use your fingernail, bone-scoring tool, back of a spoon or the blunt side of a dinner knife to press the crease fold very tight.
Join each folio through the center crease. Staple through the paper into an eraser or cork. Fold over the staple ends with the blunt end of your dinner knife or thumbnail. Repeat at the other end of the crease, and with the remaining stacks so that each folio is stapled twice.
Alternatively, you could punch small holes neatly into the center of the crease with an awl and sew each folio with several stitches with waxed thread or dental floss.
Stack the folios tightly together and clip the top and bottom edges with large paper or binder clips. Select thin fabric for the spine binding. Cut this the length of pages, wide enough to cover the width plus 2 inches of what will become the spine. The overhang on each side will be used soon to connect the spine to the cover boards.
Apply glue to the center of the fabric strip—there should be 1 inch on each side of the fabric that will not have glue until a later step. If you have a glue gun you can use it here. Before the glue has a chance to set, place the folio spines centered on the fabric. Prop up until glue is dry.
Trace out a cover a bit larger than the pages. Cut out two cover boards. Cut a third piece of board the width and length of the folio spine to serve as a “spine board.”
Place the cover boards with the spine board in between on the chosen cover material and mark out so that there is a border of about an inch all around. Cut out the material and place (nice side down) on a flat surface. Spread an even coating of glue over one side of the cover boards and spine and lay them down carefully in alignment with each other with a small gap between the spine and each cover board. Glue the edges of the fabric down, trimming and tucking the corners in with a bit of extra glue as needed.
Attach folios to the cover. Spread a thin line of glue along the center edge of the two cover boards. Place the bound folios centered on the (dry) spine board so the flaps of fabric are lined up on the glue. The spine board does not get glued but rather remains a flexible protective joint. Prop up folios until glue dries.
You’re almost finished: Add a liner to the inside covers to turn this functional craft project into a work of art. Break out your stash of marbleized paper or lovely old gift wrap. Thin stiff cloth works well. Measure and cut paper or cloth to fit just inside the combined dimensions of cover and first page. Cut out the material, fold and crease (if using paper), spread back with glue and carefully affix in place. Repeat for the back.
When gluing fabric or paper, remember that a thin coat over the entire surface is best. Be sure to line things up well and then press and smooth from the center toward the edges to prevent wrinkles. If wrinkles persist after several days, try running a barely hot iron over wrinkled surfaces.
Here are some other ideas: A personal travel journal could use maps for the cover and favorite restaurant menus or train schedules as liner; your garden book could utilize seed catalog pages and grow charts; collect quotes and photos and send your kid off to college or camp with an album made with part of a favorite (outgrown) T-shirt.
You’ll need to make a book just to keep track of your ideas.
Anna Herman is a garden educator who raises chicken, ducks, bees, fruits and veggies in her Mount Airy backyard.
The other day my sister mentioned that she is planning to make handmade hardcover journals. I appreciate that this post highlighted that it is important for us to be mindful of the paper quality as it will impact the journaling experience. I will definitely keep this information in ming for future references when I speak with my sister.