
 Becoming a home artisan is easier than you think
by Marisa McClellan
Fire-roasted tomatoes. Vanilla-rhubarb jam. Plums in honey. Preserved Seckel pears. No, this isn’t the inventory list of some new upscale grocery—these are just a few of the foodstuffs I preserved last summer and have been happily eating all winter long.
Home canning is the latest vintage culinary skill to experience a revival, particularly with the younger, urban set. Folks from coast to coast are rediscovering how satisfying it can be to put up pickles and eat jam made with their own hands. Will this be your summer to start canning? To become an artisan yourself?
History Lesson
Home canning is a method of food preservation that has been popular in the United States since the late 1850s, when John L. Mason invented the first reusable jar with a screw-on lid. We know them today as Mason (imagine that!) or Ball jars. Canning technology has gradually improved since, and in 1915, Alexander H. Kerr came up with the two-part canning lid—a descendant of which is used to this day.
The mechanics behind canning are fairly simple. You fill a clean jar with jam, pickles or whole fruit in syrup, apply the flat lid and the threaded ring to the jar, and submerge the filled jar in boiling water for a prescribed amount of time (times vary widely, depending on what you’re canning). When you remove the hot jar from the water, the heat begins to escape, taking with it any air left in the jar. The escaping oxygen pulls the lid down, creating an airtight seal. A food-safe sealing compound embedded into the lid aids in the maintenance of the seal. High acid food preserved in this manner will stay delicious for up to a year.
In the last 60-plus years, as the majority of food production became industrialized and the full-service grocery store became the norm, home canning experienced a drastic drop-off in popularity. It went from being a seasonal necessity—how else would you preserve the bounty of your kitchen garden and fruit trees?—to a neglected art, still practiced in more rural areas, but nearly abandoned by city dwellers.
But as concerns over food miles, pesticides, unsustainable farming practices and chemicals in commercially packaged foods have emerged, a segment of the population has rediscovered home food preservation as a way to reclaim control over their stored, shelf-stable foods.
Happily, the rise of urban farmers’ markets, Community Supported Agriculture (CSA) programs, buying clubs and community gardens has made it increasingly easy to obtain bountiful amounts of seasonal, locally-grown fruits and vegetables for canning.
Get Started
To get started, let go of anything you’ve heard about canning being scary or dangerous. Right now, we’re only talking about the home canning high-acid things like jams, pickles, tomatoes and fruit in syrup. Botulism, that fearsome bacterium, cannot grow in high-acid environments. This means that it can not possibly develop in your carefully canned strawberry jam. You can safely share it with impressed friends, content in the knowledge that it will cause them no harm.
Now to the canning—first, take stock of your current kitchen supplies. You’ll want to gather some tongs, a wide-mouth funnel, a variety of measuring cups and, if you’re feeling really committed, a jar lifter. (If you’re going to do a lot of canning, I recommend this tool; it’s saved me from a number of hot water burns over the years.) A large, wide, non-reactive pot like an enameled Dutch oven is a good vessel for cooking jams and jellies. A deep stockpot can easily stand in for a dedicated canning pot (even better if you have a small, round rack to sit at the bottom of the pot). A generous stack of kitchen towels is always incredibly helpful.
Now that you have your tools in place, some tips to set you off on the right path:
- Work with the freshest produce around. Take care not to purchase more than you can process in a 48-hour period.
- Always can what’s in season. In the Philadelphia area, that means you make your pickled asparagus in May, strawberry jam in June and put up as many tomatoes as you can manage during August and September.
- It can be a challenge to keep your pickles crisp. Cut off the blossom end of cucumbers and slip a grape or cherry leaf into each jar for optimum crunch.
- When making any sweet preserve with bits of fruit or peel in it, stir it off the heat for at least a minute when the cooking time is up. This helps evenly distribute those bits throughout.
- When processing your canned goods, never start your timer until the water has returned to a boil.
- If your recipe calls for a processing time of 10 minutes or longer, you do not have to use sterilized jars, just clean ones. If the processing is less than that, make sure to sterilize the jars by boiling them for 10 minutes.
- Never pour hot preserves into cold jars. The heat shock can cause the jars to break.
- Once the jars have cooled completely, always check to ensure that they’ve sealed tightly. Do this by removing the band and gently wiggling the lid. A good seal means that it will not budge.
- Always store jars in a cool, dark place without the bands. This allows you to more easily see any bad seals or bulging lids.
Why Can?
Admittedly, home canning isn’t for everyone. However, for those bitten by the preserving bug, it can be deeply satisfying. It offers an opportunity to engage with one’s personal food supply in a far more active way than is typical in mainstream American culture. It raises awareness of the seasonal cycle of fruits and vegetables. And, if done right, it makes affordable high-quality, handmade food products.
We all know that artisanally-made products are currently in vogue. And yes, it’s always a delight to be able to buy from craftspeople who make their living by practicing their arts. However, an addiction to $8 half-pints of handmade marmalade can quickly start to break the grocery budget.
Canning provides the opportunity to make your own unique, small-batch goods, enlivening your toast, yogurt and sandwiches all year round. What’s more, a well-stocked pantry of home canned goods means that you always have a quick birthday or housewarming gift within easy reach.
No matter what your reason for canning, you’ve made something that tastes good and, when eaten in January or February, it will be a powerful reminder that the time of abundance will return again.
Marisa McClellan teaches seasonal canning classes; visit foodinjars.com for more dates and times.
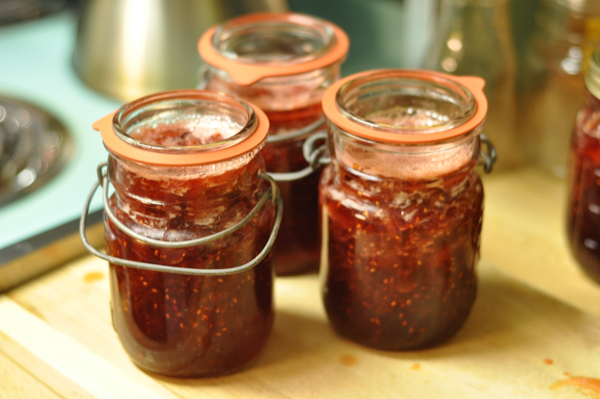
Strawberry Jam
Makes seven pints
- 10 cups of chopped strawberries
- 7 cups of sugar
- 2 lemons, zested and juiced
- 2 packets of liquid pectin (that’s one box total)
- Prepare your canning pot by filling it two-thirds full with water and bringing it to a boil. When it boils, turn the heat down and keep it at a simmer. Place the lids in a saucepan of warm water and bring them to a gentle simmer, in order to soften the sealing compound.
- Put berries, sugar, the lemon zest and lemon juice in a large (at least six quarts), non-reactive pot and cook over high heat for 15 to 20 minutes. Boil the fruit until it develops a syrupy consistency. Reduce the heat and, using an immersion blender or potato masher, break down some of the fruit. Be careful not to over-blend if you’re using an immersion blender.
- Raise the heat back to high and bring the jam to a boil. Once it has reached a sustained rolling boil, squeeze in the pectin. Let boil for approximately 10 minutes, until the jam looks thick and viscous.
- Lay out your clean jars. Fill the jars. Wipe the rims with the edge of a towel dipped in boiling water. Top with lids and screw on rings. Carefully lower the jars into the boiling water. When using small jars, you can stack them one on top of the other if need be.
- Process for 10 minutes in the boiling water bath (don’t start your timer until the canning pot returns to a boil). When time is up, remove the jars from the water and put them on a towel-lined counter. They should begin to ping fairly quickly, indicating that they’re sealed. If any of your jars don’t seal, make sure to refrigerate them. Once sealed, the jam will last on the pantry shelf for up to one year (of course, it rarely lasts that long).

Asian-Inspired Quick Pickles
Makes one quart
- 5-6 Kirby (pickling) cucumbers, each cut into six spears
- 1 chili pepper
- 1 cup seasoned rice wine vinegar (look for a brand that uses sugar instead of high fructose corn syrup; Trader Joe’s makes a good one)
- 2 limes, juiced
- 3-4 scallions, chopped (greens and whites)
- 2 garlic cloves, sliced
- 4 sprigs of mint, chopped
- 1/2 tsp. salt
- Pack the cucumber spears into a quart jar. Slide the chili pepper down in among the cucumber spears.
- In a 2-cup measuring cup, combine the rice wine vinegar, lime juice, scallions, garlic cloves, mint and salt. Pour over the cucumbers. Using your fingers, poke some of the garlic slivers, mint and scallion down among the cucumbers.
- Screw a lid on the jar, and, holding it over the sink (in case of leaks), invert the jar and give it a good shake, in order to distribute all the delicious bits.
- Let your pickles sit in the refrigerator for at least 24 hours before eating.
Pickled Garlic Scapes
Makes two pints
- 1 ½ pounds of garlic scapes
- 2 tbsp. pickling spice blend
- 1 ½ cups apple cider vinegar
- 1 ½ cups water
- 2 tbsp. kosher salt
- Prepare your canning pot by filling it two-thirds full with water and bringing it to a boil. When it boils, turn the heat down and keep it at a simmer. Place the lids in a saucepan of warm water and bring them to a gentle simmer, in order to soften the sealing compound.
- Measure one tablespoon of pickling spice into the bottom of each jar. Wash and trim the garlic scapes. Fill the jars with garlic scapes using one of two methods: Either chop them into two-inch lengths and pack them in, or go with the naturally curly nature of the scapes and swirl them into the jars. (This technique will leave some empty space in the center of the jar, which you can then fill with shorter bits of scapes).
- When your jars are filled, make the brine. In a medium saucepot, combine the vinegar, water and salt. Bring to a simmer, stirring until the salt is dissolved.
- Using a wide-mouth funnel, pour the brine over the garlic scapes, making sure to leave half an inch of headspace (that’s the amount of room between the top of the brine and the rim of the jar). Using a chopstick or plastic knife (you don’t want to use metal on jars that will be processed in a boiling water bath), work the air bubbles out from around the garlic scapes.
- When all the air bubbles have been removed, wipe the rims of the jars with a clean towel to remove any spilled brine. Apply the simmered lids and screw the bands on. Process in a boiling water canner for 10 minutes (starting the timer when the pot returns to a boil). When the processing time is up, removed the jars from the bath and let them cool on a towel-lined counter top. These pickles are good for up to one year.
Home canning is a wonderful way to have foods all winter from your garden. The Philadelphia Master Gardener Series for the summer is presenting a workshop on August 14th. Anyone interested should come and hear Lois, she has been doing this for years. Information can be found on the Penn State Philadelphia extension site http://philadelphia.extension.psu.edu/Horticulture/MG_Flyer_summer_2010.pdf.
Home canning and other food preservation is also a very "green" activity for several reasons: using locally produced foods, re-using jars instead of tossing cans and better nutrition for you and your family. It also gives a family an opportunity to eat better quality food and a greater variety of foods.
When a family is canning and freezing, it is easier to spend less on the monthly food budget. Home gardening is an excellent excuse for home canning and freezing as well. And as Marisa states here, it's just plain satisfying!
Hi. I love your site and was wondering if you could help. I’ve made cold-dill pickles before in gallon glass jars and they were great, however, with our family of 7 I wanted to find a bulk way to do it and was considering 5 gallon food-grade plastic buckets….would that be horrible and should I stick to the glass gallons until I can afford a crock? I’ve looked into crocks and am scared to buy used because the glaze may contain lead. Any advice would be great! Thanks!!
viagra online